Designing Outdoor Classrooms: Transforming Learning Spaces for Nature Connection
Lily Claire Taylor
James Madison University
 Creating an outdoor space can be a lot of work, but the benefits exceed that work! By providing that outdoor space, students have the opportunity to connect with nature while learning. While placing logs outside is effective, there is a lot of potential in elevating the functions of outdoor classrooms. In this article, we will explore some of the ways the James Madison Students of Industrial Design innovated or enhanced the outdoor learning space. For this project, the Industrial Design had funding. We worked with Brooke Imber, the art teacher at Keister Elementary School, who got a grant to fund the project. We also had a lot of volunteers and community help in clearing spaces for us, and in-kind services provided us with most of the materials.
 The first step was the design concept. We wanted to make sure every voice was heard, so some of the things we did was ask the teachers what they wanted to see in the design. We also considered the space, the positioning of each component, and the intended purpose of the space. We wanted to design a space that is both a suitable transition out of a traditional classroom for both teachers and students as well as a space that improves the minds of students and their connection to nature. We wanted to incorporate elements that promoted interaction with nature, such as adding natural materials so as not to distract the students and to make it fit within a forest setting. It matters about the area you choose and the material you use. We learned about the ecology of space and what is around us, and we had to select materials that would withstand the climate that we are in. We used treated wood for anything that went into the ground because the ground had a lot of moisture, and the wood would be ruined. We also considered materials like ballistic nylon, which is water-resistant. Materials matter if you want to choose durability and prolong the life of what you created.
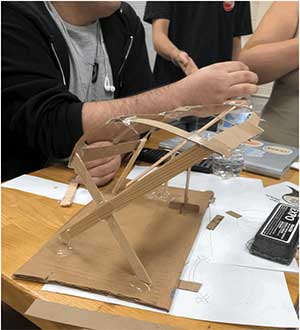
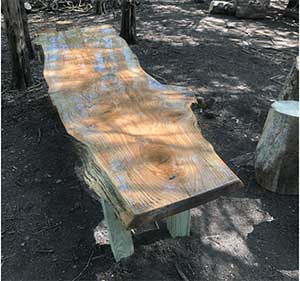 With creation again, we had lots of outside resources to help achieve our vision. The first thing we did was look at the place we were designing for. What should go where and why? Then, we cleaned the area so it is usable and a defined space. Then, we made detailed plans on what we needed since we had a tight budget. We made models and drawings to make sure the measurements were correct. When we got the supplies, we started to build. Having detailed models made construction more straightforward. We moved a batch of tree stumps from a lumber yard and moved them onto the school grounds, and we started to dig holes because we were making mastered chalkboards to go into the ground. We used shovels, root breakers, and jackhammers to make the holes because we lived in a rocky area. While doing that, we also started to cut wood and made cuts to connect pieces together. Then we began to split wood for the lamentation for the amphitheater and made legs for those and the chalkboards. We painted the plywood with chalk paint for the chalkboard and cut the ballistic nylon for the mothered ones. For the chalkboard painted, we added about three layers, and it works well for the blessed nylon that is going to stretch around the bent laminated frame. For the aa mothered, we had to sew the edges with a machine, so it would not fray. With all these moving pieces, we wanted to make a few tables, so we got some from the community, sanded it, filled the holes with epoxy, finished the top for durability, and added a coat of epoxy on the table for water resistance. Then, the complex parts begin assembly. We stapled the ballistic nylon into the frame for the amphitheater, and everything else was ready to transport. Since we were working in the woodshop of a university, we had to transport our projects to the site that needed to be fully assembled. Once it was at the elementary school, we used concrete to secure the legs of the chalkboards and the amphitheater legs. We secured everything with big screws and made sure to pre-drill to not split the wood. I arranged all the stumps around the matter and tables for seating. This was not easy, but we had many hands that helped us achieve this.

Share
LATEST RESOURCES
Engaging Digital Natives Through Literacy, Outdoor Learning, and Technology
Engaging Digital Natives Through Literacy, Outdoor Learning, and Technology
Erik […]

Pages to Puddles: Story Walks as a Creative Tool for Assessing Stormwater Knowledge
Pages to Puddles: Story Walks as a Creative Tool for […]

Teaching and Learning about Obligate Species in Vernal Pools
Teaching and Learning about Obligate Species in Vernal Pools
Suzanne E. […]

![A logo for The Sweeping [...]
</p srcset=](https://blueswallowfarmfoundation.org/wp-content/uploads/2025/03/sweeping-change-fund-1024x538.jpg)
